Navigating on a kayak trip, whether a day trip or longer expedition may require use of one or more of:
- Garmin GPSMAP 78sc - the Kayak-ready GPS unit!
- Silva Base Plate Compass
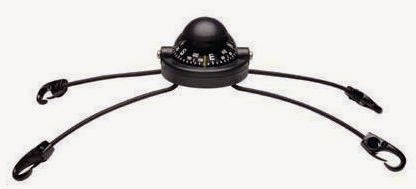
- Silva 58 Deck Compass
- Navionics for iPad - keep your iPad safe in a WaterShed Grid tablet case.

A good reference for Sea kayaking in the south hemisphere is Sea Kayaking - A Guide For Sea Canoeists by Phil Woodhouse.
This entry is primarily concerned with GPS use, though the Navionics software for iPad and mobile contains some GPS functions. This is not intended as a comprehensive guide, but does give a range of useful functions of this model. For further information contact us on 03 9597 0549 or info@eastcoastkayaking.com
Attend our Show and Tell session - Kayak Navigation
Coming soon in 2015
 Why choose this GPS model
The Garmin GPSMap 78sc has:
- Colour screen - so different colours of marine charts can be seen
- BlueCharts for AU, NZ & part of Sth Pacific preloaded
- Memory expandable with a microSD card slot - you can purchase additional cards & load charts from other areas purchased
- Buttons are that are easier & quicker to use on the water than touchscreens
And it gives you something to play with as you paddle!
Tips and Tricks
- Replace GPS unit’s batteries each day on an expedition, otherwise every 2 days
- Do not leave open on Map pages as is burns valuable battery life
- While on the water place GPS unit in an Aquapac 348 waterproof case
- Understand how to also use a Base plate and Deck-mounted compass, and carry Charts copied onto waterproof paper. Do not rely on technology 100%! Each person on an expedition should have and know how to use independent GPS units, in case one fails
- Use Google Earth to plan your trip - useful for finding beaches and landing sites.
- When working between your GPS, paper charts, Homeport software and Google Earth, make sure you are using the same Lat/Long units (eg. degrees & decimal minutes) and map series (WGS 84)
1. Setup
- Batteries - use Lithiums - will last 2 days for longer crossings if used with Compass/Trip Computer screen, less for Map page. Select correct Battery type in System
- Position Format:
- Charts - will be preloaded & enabled in this model & correct map series selected (WGS 84)
- Lat/Long - use decimals rather than seconds (hddd°mm.mmm’) - align with your paper charts
- Display - Battery Saver - leave OFF - otherwise screen will blank and you will waste time pressing buttons to wake it up. Instead reduce battery consumption by reducing Backlighting (reduce Backlight Timeout) and reduce backlight brightness by quickly pressing the power button and use the toggle.
- Heading - North reference - you can choose True, Magnetic, Grid or User. it is easier to leave as True and be aware of what the magnetic variation is. Also this is the menu where you should Calibrate the compass function.
2. Setting Waypoints
- Setting a waypoint for the location you are currently at:
- Hold down the Enter/Mark button and the waypoint screen is opened, recording Lat/Long. Use rocker button to navigate through various fields to add notes or descriptive waypoint name. Enter to select letter/number/Done.
- Select Done to save & return to Page - Setting a waypoint from known Lat/Long to navigate to:
- Read Lat/Long off chart / atlas / Google Earth or other record (eg. SPOT record from someone elses’ trip!). Make sure the units are the same when copy/pasting Lat/Longs, eg deg & dec minutes
- Menu / Waypoint Manager / New Waypoint
- Use rocker button to navigate through various field and add notes or descriptive waypoint name. Enter to select letter/number/Done.
- For ease of use, if naming waypoints in an area use a meaningful prefix, eg. WP-001 for a waypoint at Wilson’s Prom
- Return to map or other page or use Go to navigate to this waypoint
3. Creating a Route from a set of Waypoints
A route is a series of two or more waypoints that leads you to your destination. Either first ensure you have all the relevant waypoints already entered in your GPS or select them off the map page as you go.
- Using existing waypoints:
- from Main Menu, select Route Planner / Create Route / Select First Point
- Select Waypoints, then first waypoint by name/number. Enter (selects Use)
- Toggle to Select Next Point, Enter, then select Waypoints and the next waypoint in the route - continue until all the relevant waypoints are selected
- Press Quit button to save the route
- Name the Route:
- from Main Menu, select Route Planner
- Select the route (eg. at this stage it is probably called Route 001), Enter
- Toggle to Change Name, Enter, then use the keyboard screen & toggle to type a new name, the Done - View the Route on a Map
- from Main Menu, select Route Planner
- Select the route, then View Map - Navigate a Route
- Press Find button and select Routes
- Select a route, then Go
- this will direct you to each waypoint in turn
4. Tracking & use of GPS for direction/speed monitoring - Pages
- Compass - this page is useful for navigating to next waypoint on a Route - note that it is a straight line so if the waypoint is behind a headland it will point in that direction. Also has speed & distance to next. While in this screen use Menu button to bring up page-specific options - the fields being tracked can be varied.
- Trip Computer - again the Menu has the option of varying which fields are monitored. Use menu to Reset the fields & Track as you are about to set off on your journey - otherwise the average speed & odometer will continue ofn from your previous journey (& even from the drive to the launch point)
- Map - the map page displays the current map - two views are possible: North to the top of the map or the course direction to the top. Generally it is preferable to have north to the top as this is usually how we think when orienting a map. The alternate results in the view shifting around a lot with even minor directional changes. To change this go to Main Menu / Map / Orientation. Note that leaving the GPS open to the map page all the time severely reduces battery life.
- Track Manager - recording your journey:
- In Setup/Tracks/Track log select Record, Show on Map. Select Record Method - an option to record track points according to Distance, Time or Auto
- Select Recording Interval - Normal will be ok for most purposes
- Your track will record as you travel. at the end of your journey save your track by Track Manager/Current Track / Save Track. It is now ready to transfer to your computer if you choose (see below)!
- Clear the track at the start of your next journey - Setup / Reset/ Clear Current Track / Yes
5. Trip Planning
Charts on the PC/Mac
Rather than use up your GPS batteries, use your computer to aid in trip planning - you can use Garmin’s Homeport software allows you to connect your GPS unit to your PC/Mac and view the Garmin BlueCharts and create waypoints and connect them into routes for your day trip or expedition. You can also view any other purchased marine charts on this software.
HomePort Software Link
Homeport software is free and is designed to work with the BlueChart marine charts on your GPS so that you can download / upload from your GPS to/from your computer.
Creating Waypoints & Routes ahead of time
- First select where you want your waypoints / routes to be saved (eg. in My Collection)
- Creating Waypoints:
- Use the Waypoint tool in Homeport to simply click on the map where you want to place the waypoint. You can add notes and change the icon in the waypoint’s properties screen.
- Alternately, click anywhere on the map to create a waypoint, then double click on that waypoint to open its properties window (Advanced tab), then type in the co-ordinates you have previously sourced.
 |
| Adding waypoints and connecting them to form a Route |
- Creating Routes:
- To create a route on the Map - click on the Route tool and click on the locations on the map you want the route to follow. To end and save the route right-click or Esc.
- To create a route from a set of waypoints, select a waypoint or use Command key to select multiple waypoints and and click Create Route from Waypoint(s). To edit the route hold down the Option key to add extra points to bend your route around land masses.
 |
| Create and edit Routes in Homeport |
Using Homeport with Google Earth
Use Google Earth to plan your trip - useful for finding beaches and landing sites. Use the Add Placemark button to mark a point. Copy the latitude & longitude from the Google earth placemark info window into a new waypoint in Waypoint Manager or in the Homeport software.
- Uploading and Downloading from your computer
- Save your waypoints and tracks from your trip to your computer:
- Connect the Garmin GPSMap 78sc to your computer using the USB lead and open Homeport software.
- Use the Transfer / Receive from Device… menu item or Receive button
- Select what you want to transfer - eg. waypoints and tracks. All the data of this type will be transferred so it is useful to clean up the memory from time to time.
- The tracks and waypoints will be saved as a list in My Collection as Recently Read from [device name] - you should rename this list to something more meaningful - If you have created a set of waypoints and routes on your computer as part of trip planning you can transfer these to your GPS unit.
- Connect the Garmin GPSMap 78sc to your computer using the USB lead and open Homeport software.
- Select the list you want to transfer from My Collection
- Use the Transfer / Send [List name] to Device … menu item or Send List button
Other features - tides and currents
- On the GarminGPSMap 78sc: go to Tides and Currents using the Find button and select either Tides or Currents. A list of nearby tide/current stations will appear - select one with the Enter button. Then Menu / Review Point will give you the high & low tides / currents for the current day. Menu again brings up more options including a Chart of the tide heights and the ability to choose a different day (Change Date - then left or right toggle).
- In HomePort: there are Tide and Current menu buttons - click on either to bring up a list of tide and current stations. Click on any one of these points to show tide or current data respectively - the “i” info icon will reveal a chart of the data.
 |
| Tides function in Homeport |
 |
| Checking our route - waterproof paper on our SW Tasmania adventure |
Electronic devices can let you down so never rely wholly on them - trying to push batteries too far or ingress by salt water could spoil your day. Always have a back up - know how to navigate with a base plate compass and carry charts copied on waterproof paper on your deck. Enlarge the detail so they can be read unaided!
In December 2013 we kayaked the SW Tasmanian Wilderness of Bathurst Harbour and Port Davey in our Trak Seeker 16T Performance sea kayaks - the Garmin GPSMap 78sc performed brilliantly and we also referred to paper charts.
Check out our YouTube of the journey!
No comments:
Post a Comment